April 28, 2011

Blueberry Syrup


Maybe you already realized, but I love breakfast. It's my favorite meal of the day. I always wake up hungry and ready to eat. I try to make a filling breakfast because it has to last me a long time. Most days, I eat breakfast at 6:15am, so I try to have it keep me full until at least 11. Long before all the hype about how healthy it is to eat breakfast, I ate it out of hunger and love for the foods.

Anytime the Bup and I have a morning off together (which happens maybe once a month, making it even more exciting), I make a cooked breakfast. It's usually pancake, but sometimes I do waffles. French toast is low on the list, but it does sneak in occasionally, especially if I just baked a really good bread.


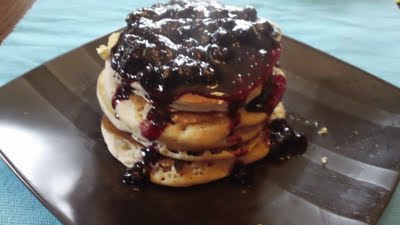
The last time I made breakfast I made buckwheat pancakes, which are pretty standard for us, so I dressed them up with blueberry syrup. The blueberries are from my parents' cabin in northern PA, so they're organic (not certified, but I know it's the case) and flavorful. We always end up with a ton and I froze some this year to make sure we'd be able to have them during the winter. I'm stingy with them, though. This was a splurge! I know the fresh season is coming in a few short months so we can finish our frozen ones without worrying.


Making blueberry syrup is so simple. Add blueberries, add zest, add sugar, cook.


Then pour over pancakes and enjoy.

I burnt my tongue licking the spoon. It was worth it.

Blueberry Syrup
Serves 2

1 cup blueberries, frozen
1 tsp lemon zest, or more to taste
1/4 cup cane sugar or honey

Pour blueberries in a small pot. Heat on low until blueberries soften. Add zest and sugar/honey. Stir occasionally until mixture becomes slightly syrupy, about 5 minutes. Serve immediately.


Blueberry on FoodistaBlueberry

April 27, 2011

Our Garden: Part 3


Look what Mom gave me!


This pot held about 20 bulbs, which I planted in 8 different holes.


I like to wear gardening glove to keep the dirt from underneath my fingernails. There are 2 problems with that. First, I don't have long or well-manicured fingernails to be protecting. Second, my $1 pair of gloves promptly ripped at the fingertips, making them useless. I wear them anyway.


I kept digging and digging but it never seemed deep enough.


I'm determined that next year we'll have more daffodils in spring than we did this year. This was our only one and it hid it's face behind our mini rosebush.


Our gardens have a lot more green than last time I showed you.


I planted cauliflower this year for the first time!


The snow peas are getting bigger. We put up a little fence for them to climb and they're so close to reaching it.


The radishes are really taking off. They love this sun and rain. I can't wait to eat them on salads but I still won't eat them by themselves. The memories of Dad feeding me one from the garden and it being so spicy my mouth burned for hours haven't quite gone away. And don't you laugh at how crooked my row is.

Next to plant: tomatoes, more lettuce, and peppers!

In case you missed them:
Our Garden Begins

April 25, 2011

5 Signs Spring is Here!


I can't stop talking about spring! I love this weather, when the air loses that chilly bite and the sun's rays seem to warm my core. All I want to do is be outside enjoying it! Here's how spring is showing it's presence around our yard.


1. We planted daffodils and mulched the front gardens. See the bits of green in the front area that weren't in the picture above?


2. The grape hyacinths are blooming everywhere! When the Bup mowed for the first time, he had to mow a bunch off because they were in the yard. And at the very top of this picture you can see the rhubarb's leaves are getting huge! Mom's jealous.


3. Composting is back in full swing. We had 6 buckets of winter scraps ready to go in as soon as spring hit. I already filled 1 1/2 more for the next round.


4. Rabbits are bouncing everywhere. This poor little rabbit wants to eat our lettuce but we put up a fence. He's sneaky, though. We've noticed him taunting the neighbor's dogs by sitting just outside their fence. They bark and bark but can't get through to him. Smart bunny! Hopefully he doesn't get so smart that he finds a way into our garden.

5. I'm sneezing like crazy. Eek! I never had allergies as a kid so I don't know why I have them now!

How is spring showing it's presence around you?

April 24, 2011

Hot Cross Buns

Happy Easter! Christ is risen!


Hot cross buns are a tradition for Easter. The cross on each bun is said to represent the cross on which Jesus was crucified. My mom has always made them each year for us and I had to continue the tradition. She made some this year, too, and we swapped a few for a taste comparison. The only real flavor difference was that mine had orange zest in the buns and she used orange juice in her glaze. Both were delicious and the perfect Easter breakfast!

Hot Cross Buns
Adapted from Sunset Magazine
Makes 16 buns

3/4 c almond milk, warmed
1/3 c sugar
2 1/4 tsp active dry yeast
1/4 c butter, melted
1 egg
1 T flax + 2 T water, combined
3/4 tsp salt
1/2 tsp nutmeg
1 tsp cinnamon
zest of 1 medium-sized orange
2 c unbleached all-purpose flour
2 c white whole wheat flour
1/2 c golden raisins

Glaze:
1 c powdered sugar
2 T almond milk
1/4 tsp cinnamon

Heat milk to about 100*F; add sugar and yeast. Let stand about 5 minutes or until bubbly.


Combine melted butter, egg, flax + water, salt, nutmeg, cinnamon, & orange zest in the bowl of a stand mixer. 


Add yeast mixture and use dough hook to mix. 


Slowly add flours, mixing carefully. Beat with dough hook on medium speed for about 5 minutes, adding a dusting of flour to the sides of the bowl as needed. The dough should come together into a smooth ball around the dough hook.


Turn dough onto a lightly floured counter 


Knead in raisins. 


Separate dough into 16 small balls and arrange evenly in a 9"x9" greased pan. 


Let rise in a warm place for 2 hours or until doubled in size. The buns should rise enough to fill the pan.


Preheat oven to 350*F. Bake for 15 minutes or until the tops are golden brown. Let cool in pan 10-15 minutes and then turn out and cool on a wire rack.


Prepare glaze by mixing together all ingredients. 


Once buns are completely cool, cross the tops with glaze. Store in a sealed container. 


Or eat immediately! 

April 22, 2011

Portobello Reubens


We finally had a proper spring day. Everyone knows that the only thing to do on a proper spring day is to GRILL!


With wine, of course, on the patio.

And then eat out there, too. Spend as little time inside as possible.


This sandwich was inspired by the Ice House, a restaurant in town. We went about a year ago and I got their Portobello Reuben sandwich. The last time we went they had removed the sandwiches from the dinner menu and I was so hungry for that sandwich that I had to recreate it. 


Portobello Reubens
Inspired by the Ice House
Serves 2

2 Portobello caps, cleaned
pinch of sea salt
pinch of black pepper
6 T sauerkraut
4 T shredded sharp cheddar cheese
2 T nacho cheeze sauce (from Angela's blog) (or Thousand Island dressing)
2 whole wheat rolls or flatbreads

Preheat grill to low. Sprinkle salt and pepper over Portobello caps and grill until the gills start to lay to the side, about 5 minutes per side. Divide sauerkraut and cheese evenly between the two caps and heat until the cheese melts. Remove from grill and place on buns. Add nacho cheeze sauce and enjoy*!

*Please consider eating these outside. Everything grilled tastes better outside. I promise.


April 20, 2011

Papaya Lessons

Sometimes I get excited about stuff and then don't read the fine print.


Example: I think I'm buying a papaya for $.99 and instead pay $3.49. Apparently that sign said $.99/lb, NOT $.99/papaya. I picked the biggest one I could find, because hey, I should get the maximum food possible if it's all the same price.

I do really well with my grocery budget, almost every time I go to the store. My first stop is always the produce section and I buy anything on my list and also other fresh stuff that looks like a good deal. Hence my buying a papaya.

Since then, I read that papayas are one of the most common fruits to be genetically engineered, so I probably won't be buying any papayas in the future.

But we are enjoying this one! And hopefully next time I learn from this and read the signs more closely.

April 18, 2011

Mocha Cheesecake

Were you wondering what we had for dessert yesterday?


It was too good to share a post with the lasagna.

Did I mention I'm not really a cheesecake fan? Cause I'm totally not. But if it has chocolate and coffee in it, all is right and I love it. This was delicious. Mommom was taking the slices to each person and one was bigger than the first 3, so I said to give it to one of the guys. She said, "The guys all have theirs. This one's mine!" :-)

Don't worry. I'll share. Come visit me!


Mocha Cheesecake
Adapted from Cooking Light
Serves 10

Crust:
2 cups crushed chocolate graham crackers
2 T butter, melted
2 T water + more if needed
Cooking spray

Filling:
1/2 cup Dutch process cocoa
1/3 cup coffee-flavored liqueur
4 (8-oz) blocks 1/3-less-fat cream cheese, softened
1/2 cup low-fat plain yogurt
1 cup sugar
1 T all-purpose flour
2 tsp vanilla extract
3 large eggs
1 1/2 tsp instant coffee granules

Topping:
2 T coffee-flavored liqueur
2 T semi-sweet chocolate chips
1 T unsweetened vanilla almond milk (or other milk)
2 T powdered sugar
3/4 tsp instant coffee granules
16 chocolate-coated espresso beans (optional)

Preheat oven to 325°. Coat a 9-inch springform pan with cooking spray.

For the crust, combine the chocolate crumbs, melted butter and water in a small bowl. Add more water if necessary to make a moist but firm mixture. Press evenly into the bottom of the pan, pushing about 1" up the sides all the way around.

For the filling, combine cocoa and Kahlua, stirring to remove lumps. In a mixer, beat cream cheese and sour cream until smooth, about 5 minutes. Add sugar, flour, and vanilla. After mixture is well combined, add eggs, 1 at a time, beating well after each addition. Pour in cocoa mixture and combine.

Pour mixture into prepared pan; bake at 325° for 1 hour and 10 minutes. Cheesecake is set when the center barely moves when you touch the pan.  Remove from oven and run a knife around outside edge to loosen. Cool on a wire rack until at room temperature. Cover and chill in pan at least 8 hours. Remove ring from pan before serving.

Melt chocolate chips and combine with coffee-flavored liqueur, powdered sugar, instant coffee granules, and milk. Add more milk or powdered sugar to reach proper consistency. It should drizzle off the spoon when you lift it. Drizzle over cheesecake and garnish with espresso beans. Serve with remaining topping and additional espresso beans.


Chocolate-Mocha Cheesecake on FoodistaChocolate-Mocha Cheesecake

April 17, 2011

Lasagna for Easter


My first time hosting Easter dinner! I really love having dinner parties.


We had my parents and grandparents over for Easter-dinner-a-week-early today. Usually on Palm Sunday we go to my grandparents, but it's getting to be too much for Mommom. Mom was going to host, but they're getting their kitchen counters redone, so it was up to me!


I had a lot of trouble deciding what to make. I didn't want to make the traditional ham dinner since I don't eat ham, but I wanted to make something special. It was always a tradition in my house growing up to have pasta on Sundays, so I made lasagna.


We made the sauce last night with tomatoes canned from last summer's garden. It smelled soooo good!


I thought about cooking the mushrooms first, but decided not to because I didn't want them to break down too much. It turned out to be good because their juices cooked into the rest and gave a subtle flavor to the whole dish. If you don't like mushrooms, you could easily skip them.


They just look so pretty! And they add lots of nutrients.


We had appetizers for when everyone arrived:  jalepeno cheddar hummus, spelt crackers, and olives. The lasagna still had about half an hour to bake and we were having a late lunch, so I was starving!


Baked and ready to serve! We played pinochle afterwards, which is a tradition when the 6 of us are together. It's always guys against girls. This time it was pretty even - we played 2 games and each team won once. Poppop always amazes me because he knows which card everyone is going to play before they play it. Maybe someday I'll have played enough to be able to do that...


Swiss Chard & Mushroom Lasagna
Serves 8 hungry people

1 box whole wheat lasagna noodles (about 18-20 noodles)
4 quarts tomato sauce
16 oz. ricotta cheese

2 c mozzarella cheese
2 T Parmesan cheese

1 tsp garlic powder
1 1/2 tsp Italian seasoning
1/2 tsp sea salt
1/2 tsp ground pepper
2 c frozen swiss chard, chopped (or substitute spinach)
5 baby Portabella mushrooms, sliced

Preheat oven to 350F. Coat a 9"x13" pan with olive oil cooking spray. Mix together the three cheeses, the seasonings, and the swiss chard. Spread a layer of sauce on the bottom of the pan. Lay noodles on the sauce to cover the bottom. Carefully spread 1/3 of the cheese mixture on the noodles. Top with sauce and another layer of noodles. Add another 1/3 of cheese mixture and then cover with sliced mushrooms. Add sauce, another layer of noodles, the remaining cheese mixture, noodles, and finish with a layer of sauce. Cover tightly with aluminum foil and bake 50 minutes. Remove foil and bake another 20-30 minutes or until you can stick a fork easily through the noodles. Let rest about 15 minutes before cutting and serving.

Note: The sauce might bubble over the edges of the pan. I placed a baking sheet on the rack under the lasagna to catch the spills and save myself the trouble of cleaning the oven.
Related Posts Plugin for WordPress, Blogger...